تم الحل ✓
categoryبرمجة وتطوير البرمجيات
schoolبكالوريوس
event_available2026-07-15
السؤال
Transcribed Image Text:
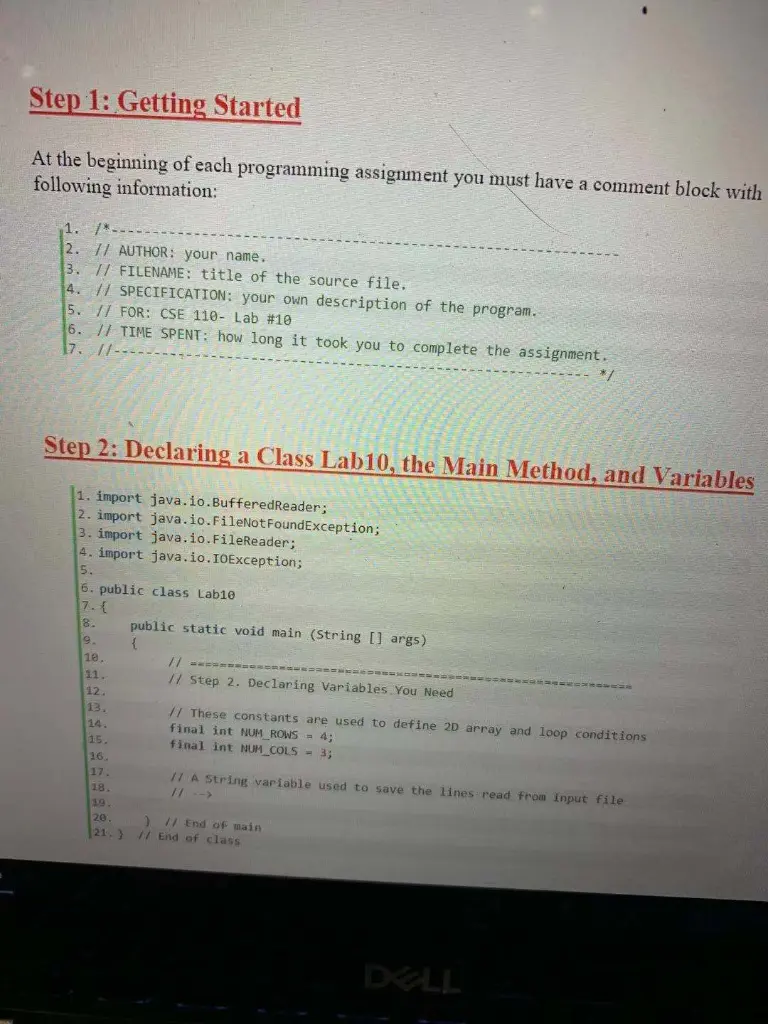
Step 1: Getting Started
At the beginning of each programming assignment you must have a comment block with
following information:
1. /*--
2. // AUTHOR: your name.
3. // FILENAME: title of the source file.
4. // SPECIFICATION: your own description of the program.
5. // FOR: CSE 110- Lab #10
6. // TIME SPENT: how long it took you to complete the assignment.
17. //---
*1
Step 2: Declaring a Class Lab10, the Main Method, and Variables
1. import java.io.BufferedReader;
2. import java.io.FileNotFoundException;
3. import java.io.FileReader;
4. import java.io.IOException;
5.
6. public class Lab10
7. {
public static void main (String [] args)
8.
9.
18.
11.
12.
// Step 2. Declaring Variables You Need
13.
14.
15.
16.
17.
18.
19.
20.
// These constants are used to define 2D array and loop conditions
final int NUM_ROWS = 4;
final int NUM_COLS - 3;
// A String variable used to save the lines read from input file
} // End of main
21.) // End of class
DELL
16.
17.
18.
19.
20.
// A String variable used to save the lines read from input fil
// -->
} // End of main
21. } // End of class
In Lab10, you would need several classes relevant to file IO, they are
-
FileReader: used to open a file and establish file input stream
BufferedReader: used to "wrap" an input stream and enhance reading efficie
FileNotFoundException: thrown when a file is not found (for FileReader)
IOException: thrown when some I/O error occurs (for BufferedReader)
All of these classes are placed in the package "java.io".
At the top of your main function, you can declare variables you need. You might need
local variables of the following types:
A String used to store one line read by BufferedReader
The two constants NUM ROWS and NUM_COLS are defined for the array size and file
reading.
A String used to store one line read by BufferedReader
The two constants NUM_ROWS and NUM_COLS are defined for the array size and f
reading.
You can declare extra variables if needed.
Step 3: Declaring the Array for File Input
1.
***
2. // Step 3. Declare the Array for File Input
3. // Please involve the two constants NUM ROWS and NUM COLS in the
4. // constructor.
15.
// -->
Make a NUM_ROWS by NUM_COLS 2D String array.
Because an array in Java is an object, we would use the keyword "new" and its constructor to
instantiate it, just like our Scanner, Person, Student, and Employee in the past.
Step 4: Preparing an Input File
1. //
2. // Step 4: Preparing an Input File
3. //
4. // Make a text file and write 12 strings in it, one string in each line,
5. // and then save it in the folder where your Lab10.java is.
6. //
7. // Note: If you are using Eclipse, please save the file out of "src"
8. // folder.
9. 11
18. // 11111 NO CODE REQUIRED IN THIS SECTION 111
DELL
you are using Eclipse, please save the file out of "src"
E
8. // folder.
9. //
10. // !!!!! NO CODE REQUIRED IN THIS SECTION !!!!!
NO CODE IS REQURED IN THIS STEP.
Please create a text file containing 12 lines as follows:
1. January
2. February
3. March
4. April
5. May
6
June
7. July
B.
August
9.
September
18. October
DELL
11. November
12. December
You can name it whatever you like (ex. Input.txt, my_input_file.txt,...) When you read the
file at Step 5, you will need the filename.
Note: If you are using TextPad, please place the file at the same place where the Lab10.java
is. If you are using Eclipse, this input file should be places "outside" of the "src" folder but
inside the project.
Step 5: Reading the File
1.
2.
try
{
3.
4.
6.
7.
// Instantiate a FileReader object to open the input file
// Note: "filename" should match the input file you made in Step 4
FileReader fr = new FileReader("filename");
5.
NY BufferedReader is for efficient reading of characters 8.
BufferedReader bfReader = new BufferedReader(fr);
9.
10. // Just like scanner.nextLine(), whenever you invoke .readLine() 11.
// on BufferedReader, it will read a single line from the file.
12.
13.
//
// As we have determined the number of lines in our file, we
will
// use constants to define the loop conditions
for (int i=0; i <= NUM_ROWS
-
14.
15.
1; i++)
16.
17.
18.
for (int j=0; j <- NUM_COLS
1; j++)
19.
28.
21.
// Read a line from the file
// Please invoke .readLine() on the BufferedReadere bfReader
// and save the returned value to the element at array
position (i, j)
// -->
} 24. }
// It is very important to close your file after reading is done
bfReader.close();
22.
23.
25.
26.
27.
28.
29.
36.
{
31.
32.
catch (FileNotFoundException e)
System.err.println("File not found");
DELL
catch (IOException e).
System.err.println("I/O error occurs");
33.
34.
{
35.
36.
}
Note: All code in this step should be wrapped inside a "try" statement and two "catch"
statements follow for exception handling. For more details, please refer the lecture slide or
the textbook.
In this step, we will read the file created in Step 4 by our program. Like user input, a file is
handled as "input stream" in Java. Java provides many tools for you to establish input stream
on a file and read data from it. Here we will use
1) FileReader to open a file and build input stream and 2)
BufferedReader to improve reading efficiency.
There are two steps here, first we need to open a file by using FileReader class:
h. FileReader fr = new FileReader("filename");
Here the String "filename" should be replaced by the filename you created in Step 4. For
example, if your input file is called "input.txt", we use "input.txt" as the parameter of this
constructor. If your file reader cannot find the file, it will throw "FileNotFoundException".
After instantiating FileReader, we need a BufferedReader to do efficient reading:
11. BufferedReader bfReader - new BufferedReader(fr);
The parameter of this constructor is the file reader we just created.
Now we are ready to read data from the file. Remember when we read input from the user,
we use scanner.nextLine(). We can use the similar method defined in BufferedReader to read
one line in the file. It would be like
DELL
ve use scanner.nextLine(). We can use the similar method defined in BufferedReader to m
one line in the file. It would be like
h.
bfReader.readLine();
This statement returns one line in the file as a single String. You can save this String to the
place you like by
"=" assignment operator.
The file reading is controlled by "file pointer", which points to the line your reader currently
read on. When you call readLine(), this pointer will move to the next line. So your program
can invoke .readLine() multiple times by loop and read the whole file. We have placed the
"for" loops you need in the template file (showed above).
Step 6: Print the Elements in the 2D Array
Finally, please print the content in your 2D array where the input data is saved.
// Step 6. Print the Elements in the 20 Array
B.
4
for (int 10; i < MUM ROWS 21 300)
5.
for (int 1-1 - IAM COLS
EX
DELL
13
Step 6: Print the Elements in the 2D Array
Finally, please print the content in your 2D array where the input data is saved.
1. //
2. // Step 6. Print the Elements in the 2D Array
3.
4.
for (int i = 0; i <= NUM ROWS 1; i++)
5. {
6.
7.
8.
9.
10.
11.
12. }
for (int i = 0; i <- NUM COLS 1; 1++)
// Print the element at position (1, 1)
// -->
System.out.println();
Sample Output
DELL
1. //
2. // Step 6. Print the Elements in the 2D Array
3.
A
4.
for (int i = 0; i <= NUM ROWS
-
1; i++)
5. {
6.
for (int i
=
0; i <= NUM COLS 1; i++)
-
7.
{
8.
9.
10.
}
11.
// Print the element at position (i, j)
// -->
System.out.println();
12. }
Sample Output
This sample output is based on an input file "input.txt" with the following content:
1.
2.
January
February
3. March
4.
April
5. May
6.
June
7. July
8. August
9.
September
10. October
11. November
12. December
Below is an example of what your output should roughly look like when this lab is
completed. Text in RED represents user input.
The content in input.txt
January
February
March
April
May
June
July
August
October
November
September
December
DELL
check_circle الجواب — حل مفصل خطوة بخطوة
hourglass_top
🔒
الحل الكامل متاح للمشتركين
اشترك في أرشيف الأسئلة لعرض هذا الحل وآلاف الحلول المفصلة خطوة بخطوة من معلمين معتمدين.